A crash course in Docker.

Some basic questions
What is Docker and why would you use it?
Docker is a tool that lets you package an application and its dependencies into a container. This makes it easy to run the application on any system that has Docker installed, regardless of the underlying operating system.
What is a Docker container?
A Docker container is a software unit that packages code and its dependencies together and runs it in isolation on a shared operating system kernel. It’s like a virtual machine, but much lighter and faster. Containers are created from images, which are pre-built templates that contain the software needed to run an application.
What is a Docker image?
A Docker image is a self-contained package that includes everything needed to run an application inside a container: the application code, runtime libraries, operating system components and configuration settings.
What are Docker volumes?
Volumes are a way to store data outside containers. All volumes are managed by Docker and stored in a dedicated directory on your host, usually /var/lib/docker/volumes on Linux.
Docker commands (the ones we’ll use daily)
run: start a container
docker run <image name>This starts a container from the image. If the image isn’t available locally, Docker downloads it from Docker Hub first and then starts the container.
ps: list containers
docker psThis lists the running containers with their container ID (randomly assigned by Docker), image name, command, when they were created, status (how long they’ve been running), ports and container name.
Add -a to see all containers, including ones that have already stopped.
stop: stop a running container
docker stop <container name>Use the container name shown by docker ps.
rm: remove a container
docker rm <container name>This removes the container permanently. If it prints the name back, the container was removed successfully.
images: list images
docker imagesLists the images available locally, with the repository, image ID, size and when each one was created.
rmi: remove an image
docker rmi <image name>This removes the image permanently (the local copy, of course). Delete any containers that depend on it before running rmi.
pull: download an image
docker pull <image name>Unlike docker run, this only downloads the image and doesn’t start a container.
💡 Note: A container stops as soon as its main process stops. If the web server inside it hits an error and crashes, the container stops too!
exec: run a command inside a container
docker exec <container name> <command to execute>We use this to run commands inside a running container. For example, start an Ubuntu container and then run commands in it with exec.
Attach and detach
docker run -d <image name>This runs the container in detached mode, so your terminal isn’t blocked until you hit Ctrl+C. It prints the container ID.
docker attach <container id/name>This attaches your terminal to a running container. You don’t need to type the whole ID, the first 4 or 5 characters are enough.
Docker run
Tags
docker run <image name>:<version>If you don’t provide a version, Docker pulls the latest one.
stdin (standard input)
By default the container isn’t interactive, so it can’t read from stdin. It only gives you stdout.
If you want stdin, use:
docker run -it <image name>-ikeeps stdin open so the container runs in interactive mode.-tgives you a terminal, so you can see what you’re typing and the container’s output in real time.
Port mapping
docker run -p <host_port>:<container_port> <image name>This maps a port on the host machine to a port in the container, so the container’s services are reachable from outside.
Example:
docker run -p 8080:80 nginx- Port 8080 on the host is mapped to port 80 inside the Nginx container.
- Traffic sent to port 8080 on the host is forwarded to port 80 in the container.
Volume mapping
docker run -v <host_path>:<container_path> <image name>This mounts storage into the container, so data persists and can be shared between the container and the host.
Example:
docker run -v /opt/datadir:/var/lib/mysql mysql- The host directory
/opt/datadiris mounted at/var/lib/mysqlinside the container. - Any change to files in
/var/lib/mysqlinside the container shows up in/opt/datadiron the host, and the other way around.
inspect: container details
docker inspect <container name/id>Gives you every detail about the container in JSON format.
logs: container logs
docker logs <container name/id>Prints everything the container has written to stdout since it was created. Really useful when the container is running detached.
Environment variables
- Key-value pairs that store configuration and can be read by processes inside the container.
- Let you change container behaviour without changing the image.
- Used to pass in sensitive values like passwords or API keys.
Use the -e flag with docker run:
docker run -e API_KEY=mysecretkey myappOr --env-file to load them from a file:
docker run --env-file ./env.list myappTo see which environment variables a container has, use
docker inspect.
Docker image
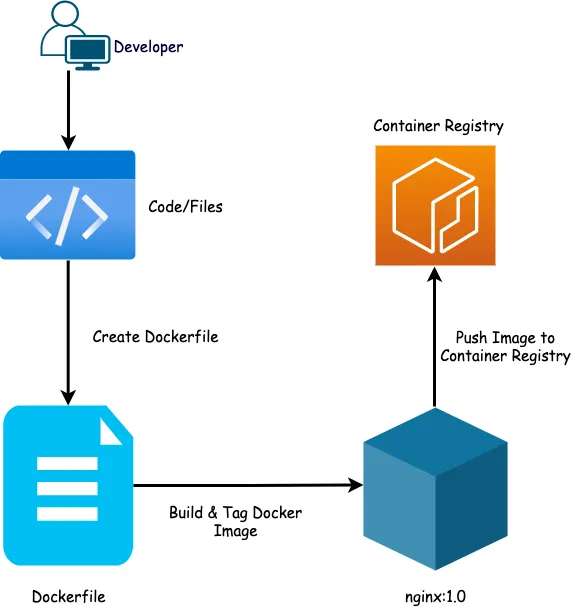
There are 2 steps to building a Docker image (assuming you already have the code):
- Write a
Dockerfile. - Run
docker buildto turn the Dockerfile into an image.
Dockerfile
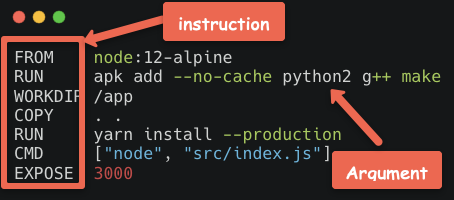
In a Dockerfile, everything on the left is an instruction and everything on the right is an argument to that instruction. The file is named Dockerfile, with no extension.
| Instruction | What it does |
|---|---|
FROM |
Sets the base image, pulled from a container registry (Docker Hub, GCR, Quay, ECR, etc.). |
RUN |
Runs commands while the image is being built. |
ENV |
Sets environment variables inside the image. They’re available at build time and in the running container. For build-time only variables, use ARG. |
COPY |
Copies local files and directories into the image. |
EXPOSE |
Documents the port the container listens on. |
ADD |
A more feature-rich COPY. It can also copy from a URL and auto-extracts tar files into the image. COPY is still recommended. To download remote files, use curl or wget in a RUN. |
WORKDIR |
Sets the working directory. RUN, CMD, ADD, COPY and ENTRYPOINT run in that directory. You can use it more than once. |
VOLUME |
Creates or mounts a volume in the container. |
USER |
Sets the user name and UID the container runs as. Use it to run as a non-root user. |
LABEL |
Adds metadata to the image. |
ARG |
Sets build-time variables. They aren’t available in the running container; use ENV for that. |
SHELL |
Sets the default shell and options for the RUN, CMD and ENTRYPOINT instructions after it. |
CMD |
The command run when the container starts. Only the last CMD counts, and it can be overridden from the CLI. |
ENTRYPOINT |
The command that runs when the container starts. If you don’t set one, it defaults to /bin/sh -c. You can override it with --entrypoint. |
Every Dockerfile must have a
FROM. The build won’t work without it. You can use an OS image or any other Docker image inFROM.
Build: create an image from a Dockerfile
docker build builds an image from a Dockerfile and a “context”. The context is the set of files at the given PATH or URL, and the build can use any file in it. For example, a COPY instruction can reference a file in the context.
The URL can point to three kinds of resources: Git repositories, pre-packaged tarball contexts and plain text files.
docker build -t <image name>:<tag> /path/to/folder/of/dockerfileUse . if the Dockerfile is in the current directory.
If you hit an error:

If you successfully built your first Docker image:

Docker volumes
Containers often need data that lives outside the container, or need to share data with other containers. It’s tempting to just use the host file system, but the better option for persistent data is Docker volumes.
Volumes are managed by Docker and are the preferred way to persist data for containers and services. When a container starts, Docker loads the read-only image layers, adds a read-write layer on top, and mounts any volumes into the container’s filesystem.
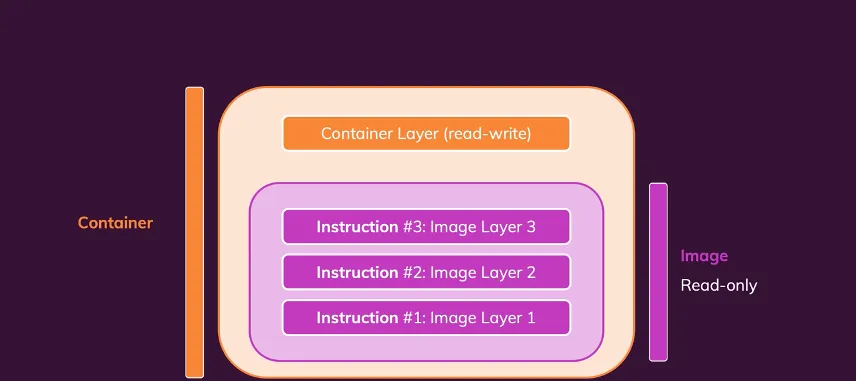
💡 A Docker volume is an independent file system fully managed by Docker. It exists as a normal file or directory on the host, and that’s where the data is kept.
When to use Docker volumes
Volumes are meant for stateful containers. You need one when a container has to permanently save new or changed files.
Typical use cases:
- Database storage: mount a volume at the data directory of databases like MySQL, Postgres and Mongo so your data survives when the container stops.
- Application data: files your app creates, like uploads, documents and profile photos, should go in a volume.
- Important caches: keep caches that would take a long time to rebuild.
- Easy backups: since all volumes live in one place, you can back up container data by copying
/var/lib/docker/volumessomewhere else. - Sharing data between containers: a volume can be mounted into several containers at once, and they all see each other’s changes in real time.
- Writing to remote filesystems: use a volume when containers need to write to network shares or other remote storage.
You don’t need a volume for containers that don’t write anything, or that only store throwaway data. A simple rule: create a volume when losing the data the container writes would cause problems.
-v vs --mount
--mount is more explicit and verbose. The main difference is that -v puts all the options together in one field, while --mount splits them up. If you need volume driver options, you have to use --mount.
-v or --volume has three fields separated by colons (:). They must be in the right order, and what each one means isn’t obvious at first:
- For named volumes, the first field is the volume name, unique on the host. For anonymous volumes it’s left out.
- The second field is the path where the volume is mounted in the container.
- The third field is optional: a comma separated list of options, like
ro.
--mount is a list of <key>=<value> pairs separated by commas. It’s longer than -v, but the order doesn’t matter and it’s easier to read:
type:bind,volumeortmpfs. Here it’s alwaysvolume.source(orsrc): the volume name. Left out for anonymous volumes.destination(ordstortarget): the path where it’s mounted in the container.readonly(orro): mounts it read-only, if present.volume-opt: a key-value option for the volume driver. Can be used more than once.
Example:
docker run -d \
  --name devtest \
  --mount source=myvol2,target=/app \
  nginx:latest
Here we’re mounting a volume using --mount. Run docker inspect devtest to check that Docker created and mounted the volume correctly. Look for the Mounts section:
"Mounts": [
    {
        "Type": "volume",
        "Name": "myvol2",
        "Source": "/var/lib/docker/volumes/myvol2/_data",
        "Destination": "/app",
        "Driver": "local",
        "Mode": "",
        "RW": true,
        "Propagation": ""
    }
],
Docker network
There are 3 types of network in Docker:
- Bridge network
- None network
- Host network
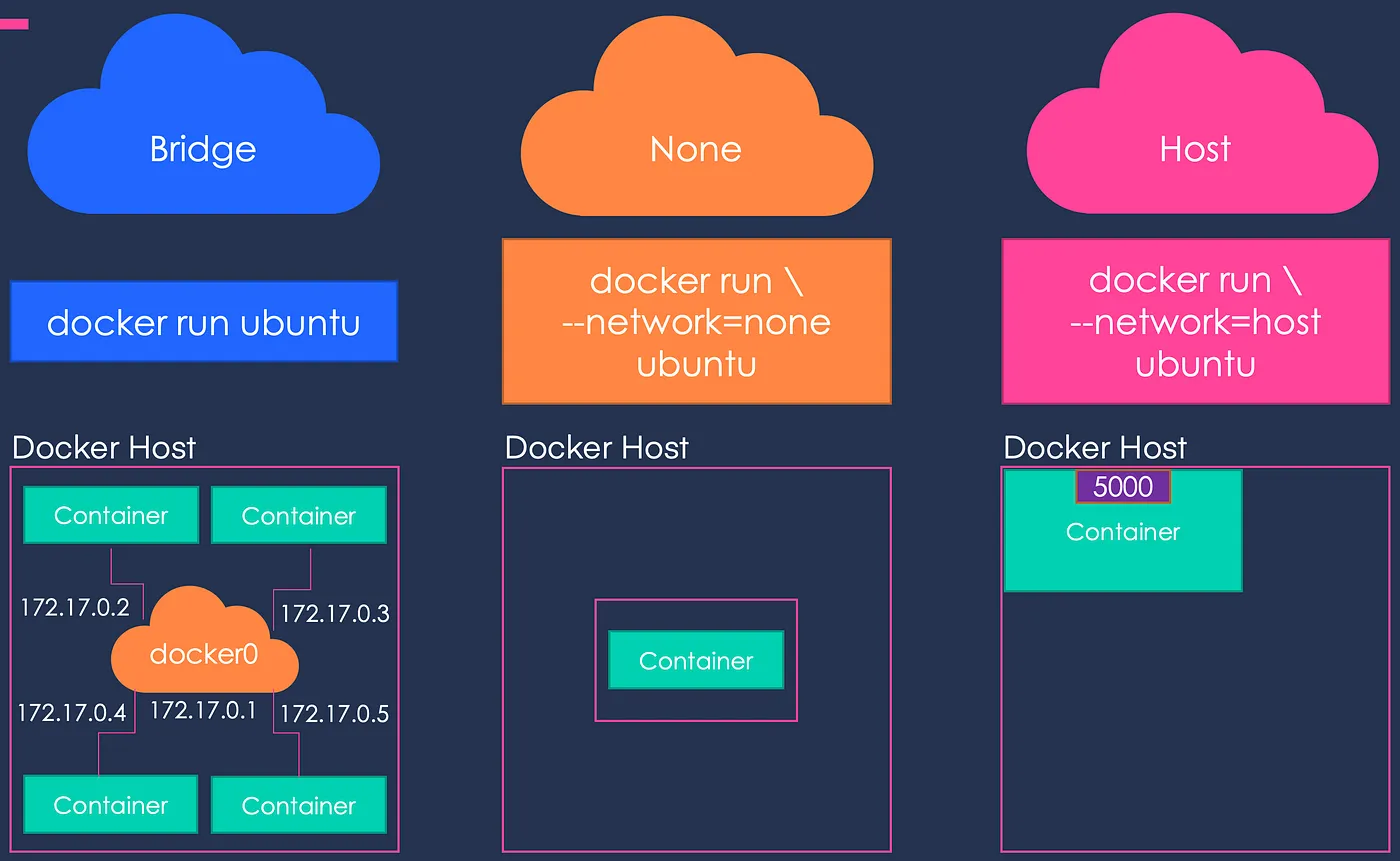
The bridge network
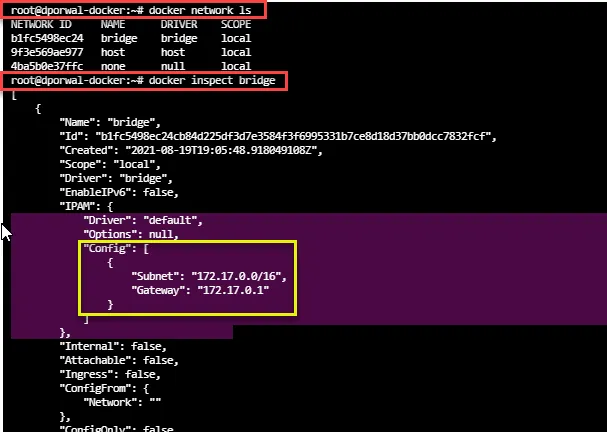
Docker’s private network, only reachable by Docker containers. By default every container gets its own IP in the 172.17.0.0/16 range.
But you can use user-defined networks too!
User-defined networks
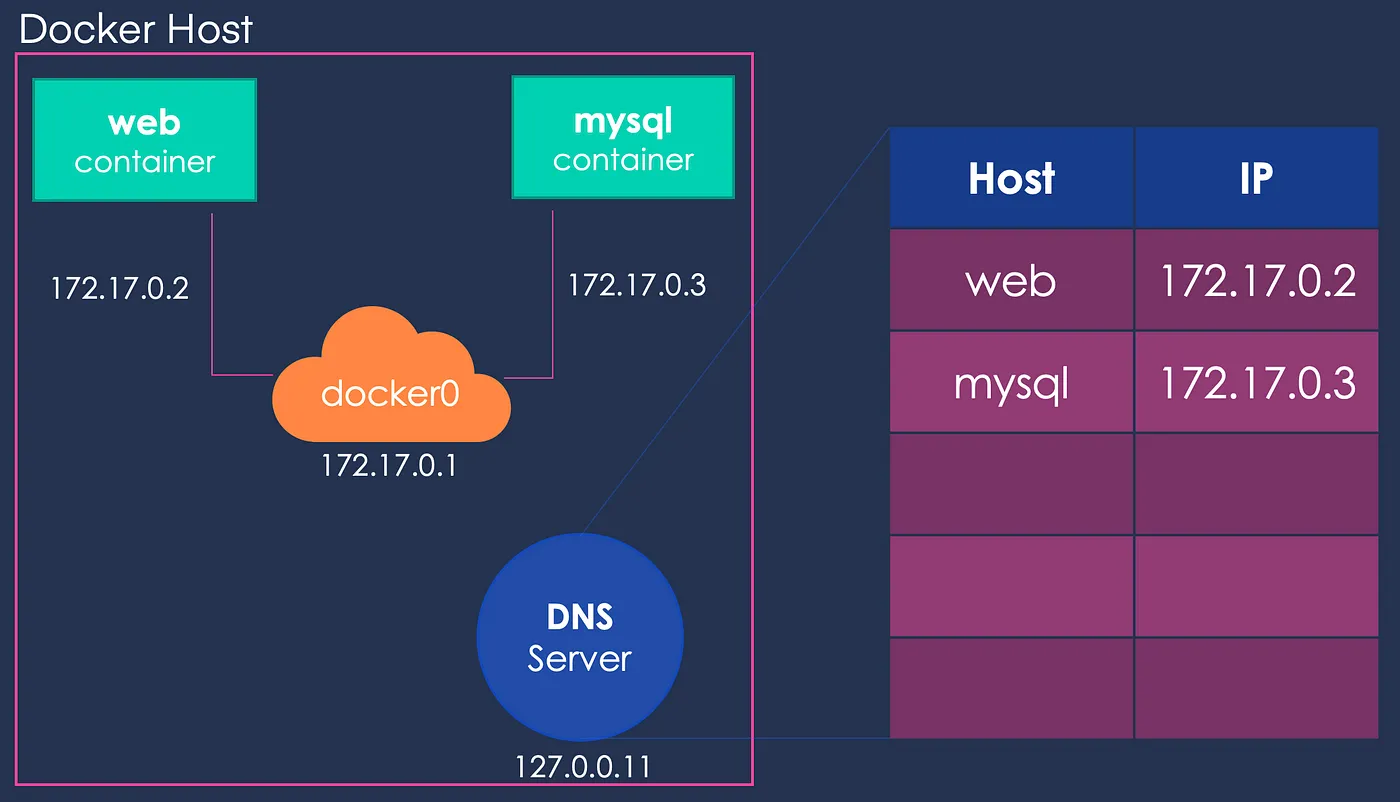
You can create your own networks and connect multiple containers to them. Containers on the same user-defined network can talk to each other using either their IP addresses or their container names.
docker network create -d bridge --subnet <subnet range> <network name>This creates a new bridge network.
Docker also has an embedded DNS server at 127.0.0.11. To reach another container, just use its name and the embedded DNS gives you its IP.
The none driver
The none driver doesn’t attach the container to any network. The container can’t reach the outside network or other containers. Use it when you want to turn networking off for a container.
The host driver
As the name suggests, the host driver uses the host machine’s networking and removes the network isolation between the container and the host. For example, if a container binds to port 80 and uses host networking, the app is available on port 80 of the host’s IP. Use it when you’d rather rely on the host’s networking than Docker’s.
One limitation: the host driver doesn’t work on Docker Desktop. You need a Linux host.
network ls: list Docker networks
docker network lsYou can also find a container’s network config with docker inspect.
You can use this too!
docker network inspect <network name>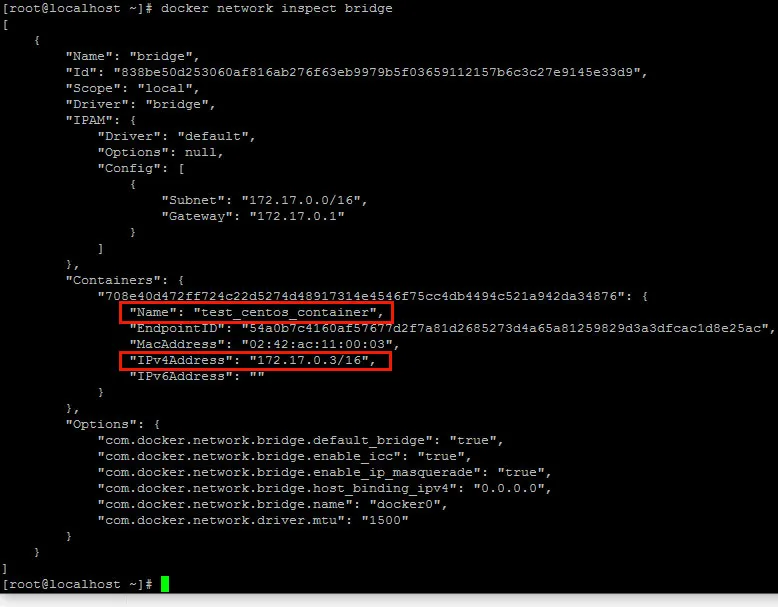
This gives a long, detailed output and we rarely need all of it. Here’s how to get just the subnet of network1:
$ docker inspect -f '{{range .IPAM.Config}}{{.Subnet}}{{end}}' network1
172.22.0.0/16
Docker Compose
The docker-compose.yml file
The core of Docker Compose is the docker-compose.yml file. It’s written in YAML and defines the configuration of your Dockerized application.
Let’s look at a real example and break it down step by step. Everything used here is standard and common. With just these keywords you can start a development workflow. There are more advanced ones for production, but let’s start with the basics.
version: '3'
services:
  web:
    # Path to the Dockerfile.
    # '.' is the directory where docker-compose.yml is.
    build: .

    # Map container port to host
    ports:
      - "5000:5000"

    # Mount volume
    volumes:
      - "/usercode/:/code"

    # Link the database container to the app container
    links:
      - "database:backenddb"

  database:
    # Image to pull from Docker Hub
    image: mysql/mysql-server:5.7

    # Environment variables used when the container starts
    environment:
      - "MYSQL_ROOT_PASSWORD=root"
      - "MYSQL_USER=testuser"
      - "MYSQL_PASSWORD=admin123"
      - "MYSQL_DATABASE=backend"

    # Everything in docker-entrypoint-initdb.d runs as soon as
    # the container is up, so this creates our tables for us.
    volumes:
      - "/usercode/db/init.sql:/docker-entrypoint-initdb.d/init.sql"
version: '3': we’re using version 3 of the Compose file format, so Docker enables the matching features.services: defines all the containers we’ll create. Here we have two services,webanddatabase.web: the name of our Flask app service. Compose creates containers with the names we give.build: where the Dockerfile is..means the directory containingdocker-compose.yml.ports: maps container ports to the host.volumes: just like-vin Docker. Here we mount our code directory at/codein the container, so we don’t need to rebuild the image every time the code changes.links: links one service to another so it’s reachable from it.image: if there’s no Dockerfile and we want to use a pre-built image, we give its name here. Compose creates a container from that image.environment: sets environment variables in the container, the same as-eindocker run.
Docker Compose commands
Docker Compose has a CLI for managing multi-container apps. Here are the common commands.
Managing services:
up: builds, creates, starts or attaches to containers for a service.-d: runs containers in the background.-t: sets a timeout for container startup.
down: stops and removes the containers, networks, images and volumes created byup.build: builds or rebuilds images for services.start: starts existing containers for a service.stop: stops running containers without removing them.restart: stops and then starts containers.pause: pauses all running containers.unpause: unpauses all paused containers.